Showing posts with label Informatica training tutorials. Show all posts

Monday, 10 November 2014

Parameterizing the Flat File Names in Informatica - Quontra Solutions

Q) How to load the data from a flat file into the target where the source flat file name changes daily?
Example: I want to load the customers data into the target file on a daily basis. The source file name is in the format customers_yyyymmdd.dat. How to load the data where the filename varies daily?
The solution to this kind of problems is using the parameters. You can specify session parameters for both the source and target flat files. Then create a parameter file and assign the flat file names to the parameters.
Specifying Parameters for File Names:
The steps involved in parameterizing the file names are:
  • Creating the Parameter File
  • Specifying the parameters in Session
  • Specifying the parameter file name
Creating Parameter File:
Assume two session parameters $InputFileName and $OutputFileName for specifying the source and target flat file names respectively. Now create a parameter file in the below format
> cat dynamic_file_names.param
[FolderName.SessionName]

$InputFileName=customers_20120101.dat

$outputFileName=customers_file.dat
Specifying Parameters in Session:
Now you have to specify the parameters in the session. Edit the session and go to the Mapping tab. In the mapping tab, select the source qualifier in the Sources folder and set the file property “Source FileName” as $InputFileName. Similarly, for target file set the “Source FileName” as $OutputFileName.
Specifying Parameter File Name:
The last step is specifying the parameter file name. You can specify the parameter file name either in the session level or workflow level. To specify in the session level, go the properties tab of the session and set the property “Parameter FileName”.
To specify the parameter file at workflow level, click on the “Worfklows” in toolbar and then on Edit. Now go to the properties and set the file property “Parameter FileName”
Thats it you are done with using the parameters as filenames. Now you have to take care of changing the file name in the parameter file daily.
Note: You can even specify the source and target directories as parameters.

For more Visit  http://www.quontrasolutions.com/blog/category/informatica/

TE_7073: Expecting Keys to be ascending in Informatica - Quontra Solutions

Aggregator Transformation computes calculations on a group of rows and returns a single row for each group. We can improve the performance of aggregator transformation by sorting the data on the group by ports and then specifying the “Sorted Input” option in the aggregator transformation properties.
The aggregator transformation will throw the below error if you do not sort the data and specified the “Sorted Input” option in the properties of the aggregator transformation:
TE_7073: Expecting Keys to be ascending
This error is due to the data sorting issues in the mapping. This is quite obvious as the aggregator transformation expects the data to be in sorted order and however it gets the data in unsorted order. To avoid this error, simply follow the below steps:
Sort on Group By Ports:
Be sure to sort the data using a sorter transformation or source qualifier transformation before passing to the aggregator transformation.
The order of the ports is important while sorting the data. The order of the ports that you specify in the sorter transformation should be exactly same as the order of the ports specified in “Group By” ports of aggregator transformation. If the order of the ports does not match, then you will get this error.
Trim String Ports:
If you are using the string or varchar ports in the “Group By” of aggregator transformation, then remove the trailing, leading spaces in the expression transformation and then pass to sorter transformation to sort the data.
Avoid Transformations that Change Sorting Order:
Do not place transformations which change the sorting order before the aggregator transformation.

For more Visit  http://www.quontrasolutions.com/blog/category/informatica/

Generate Date / Time Dimension in Informatica - Quontra Solutions

We use database procedures to generate the date dimension for data warehouse applications. Here i am going to show you how to generate the date dimension in informatica.
Let see how to generate list out all the days between two given dates using oracle sql query.
SELECT  to_date('01-JAN-2000','DD-MON-YYYY') + level-1 calendar_date
FROM    dual
connect by level <= 
        ( 
           to_date('31-DEC-2000','DD-MON-YYYY') - 
           to_date('01-JAN-2000','DD-MON-YYYY') + 1
        );

Output:

CALENDAR_DATE
-------------
1/1/2000
1/2/2000
1/3/2000
.
.
.
12/31/2000
Now we can apply date functions on the Calendar date field and can derive the rest of the columns required in a date dimension.
We will see how to get the list of days between two given dates in informatica. Follow the below steps for creating the mapping in informatica.
  • Create a source with two ports ( Start_Date and End_Date) in the source analyzer.
  • Create a new mapping in the mapping designer Drag the source definition into the mapping.
  • Create the java transformation in active mode.
  • Drag the ports of source qualifier transformation in to the java transformation.
  • Now edit the java transformation by double clicking on the title bar and go to the “Java Code” tab. Here you will again find sub tabs. Go to the “Import Package” tab and enter the below java code:
import java.text.DateFormat;
import java.text.ParseException;
import java.text.SimpleDateFormat;
import java.util.Date;
  • Not all these packages are required. However i included just in case if you want to apply any formatting on dates. Go to the “On Input Row” tab and enter the following java code:
int num_days = (int) ((End_Date - Start_Date) / (1000 * 60 * 60 * 24));
long Start_Seconds = Start_Date;

for (int i=1; i <= num_days ; i++)
{
 if (i == 1)
 {
 generateRow();
 }
 else
 {
 Start_Date = Start_Date + (1000 * 60 * 60 * 24);
 generateRow();
 }
}

Start_Date = Start_Date + (1000 * 60 * 60 * 24);
generateRow();
  • Compile the java code by clicking on the compile. This will generate the java class files.
  • Connect only the Start_Date output port from java transformation to expression transformation.
  • Connect the Start_Date port from expression transformation to target and save the mapping.
  • Now create a workflow and session. Enter the following oracle sql query in the Source SQL Query option:
SELECT to_date('01-JAN-2000','DD-MON-YYYY') Start_Date,
       to_date('31-DEC-2000','DD-MON-YYYY') End_Date
FROM   DUAL;
Save the workflow and run. Now in the target you can see the list of dates loaded between the two given dates.
Note1: I have used relational table as my source. You can use a flat file instead.
Note2: In the expression transformation, create the additional output ports and apply date functions on the Start_Date to derive the data required for date dimension.

For more Visit  http://www.quontrasolutions.com/blog/category/informatica/

POWERCENTER CLIENT in Informatica - Quontra Solutions

The Power Center Client consists of the following applications that we use to manage the repository, design mappings, mapplets, and create sessions to load the data:
  1. Designer
  2. Data Stencil
  3. Repository Manager
  4. Workflow Manager
  5. Workflow Monitor
1. Designer:
Use the Designer to create mappings that contain transformation instructions for the Integration Service.
The Designer has the following tools that you use to analyze sources, design target Schemas, and build source-to-target mappings:
  •  Source Analyzer: Import or create source definitions.
  •  Target Designer: Import or create target definitions.
  •  Transformation Developer: Develop transformations to use in mappings.
You can also develop user-defined functions to use in expressions.
  •  Mapplet Designer: Create sets of transformations to use in mappings.
  •  Mapping Designer: Create mappings that the Integration Service uses to Extract, transform, and load data.
clip_image002
2.Data Stencil
Use the Data Stencil to create mapping template that can be used to generate multiple mappings. Data Stencil uses the Microsoft Office Visio interface to create mapping templates. Not used by a developer usually.
3.Repository Manager
Use the Repository Manager to administer repositories. You can navigate through multiple folders and repositories, and complete the following tasks:
  • Manage users and groups: Create, edit, and delete repository users and User groups. We can assign and revoke repository privileges and folder Permissions.
  • Perform folder functions: Create, edit, copy, and delete folders. Work we perform in the Designer and Workflow Manager is stored in folders. If we want to share metadata, you can configure a folder to be shared.
  • View metadata: Analyze sources, targets, mappings, and shortcut dependencies, search by keyword, and view the properties of repository Objects. We create repository objects using the Designer and Workflow Manager Client tools.
We can view the following objects in the Navigator window of the Repository Manager:
  • Source definitions: Definitions of database objects (tables, views, synonyms) or Files that provide source data.
  • Target definitions: Definitions of database objects or files that contain the target data.
  • Mappings: A set of source and target definitions along with transformations containing business logic that you build into the transformation. These are the instructions that the Integration Service uses to transform and move data.
  • Reusable transformations: Transformations that we use in multiple mappings.
  • Mapplets: A set of transformations that you use in multiple mappings.
  • Sessions and workflows: Sessions and workflows store information about how and When the Integration Service moves data. A workflow is a set of instructions that Describes how and when to run tasks related to extracting, transforming, and loading Data. A session is a type of task that you can put in a workflow. Each session Corresponds to a single mapping.
4.Workflow Manager :
Use the Workflow Manager to create, schedule, and run workflows. A workflow is a set of instructions that describes how and when to run tasks related to extracting, transforming, and loading data.
The Workflow Manager has the following tools to help us develop a workflow:
  • Task Developer: Create tasks we want to accomplish in the workflow.
  • Work let Designer: Create a worklet in the Worklet Designer. A worklet is an object that groups a set of tasks. A worklet is similar to a workflow, but without scheduling information. We can nest worklets inside a workflow.
  • Workflow Designer: Create a workflow by connecting tasks with links in the Workflow Designer. You can also create tasks in the Workflow Designer as you develop the workflow.
When we create a workflow in the Workflow Designer, we add tasks to the workflow. The Workflow Manager includes tasks, such as the Session task, the Command task, and the Email task so you can design a workflow. The Session task is based on a mapping we build in the Designer.
We then connect tasks with links to specify the order of execution for the tasks we created. Use conditional links and workflow variables to create branches in the workflow.
5.Workflow Monitor
Use the Workflow Monitor to monitor scheduled and running workflows for each Integration Service. We can view details about a workflow or task in Gantt chart view or Task view. We Can run, stop, abort, and resume workflows from the Workflow Monitor. We can view Sessions and workflow log events in the Workflow Monitor Log Viewer.
The Workflow Monitor displays workflows that have run at least once. The Workflow Monitor continuously receives information from the Integration Service and Repository Service. It also fetches information from the repository to display historic Information.

For more Visit  http://www.quontrasolutions.com/blog/category/informatica/
Services Behind Scene in Informatica - Quontra Solutions

INTEGRATION SERVICE PROCESS
The Integration Service starts an Integration Service process to run and monitor workflows. The Integration Service process accepts requests from the Power Center Client and from pmcmd. It performs the following tasks:
  • Manages workflow scheduling.
  • Locks and reads the workflow.
  • Reads the parameter file.
  • Creates the workflow log.
  • Runs workflow tasks and evaluates the conditional links connecting tasks.
  • Starts the DTM process or processes to run the session.
  • Writes historical run information to the repository.
  • Sends post-session email in the event of a DTM failure.
LOAD BALANCER
The Load Balancer is a component of the Integration Service that dispatches tasks to achieve optimal performance and scalability. When we run a workflow, the Load Balancer dispatches the Session, Command, and predefined Event-Wait tasks within the workflow.
The Load Balancer dispatches tasks in the order it receives them. When the Load Balancer needs to dispatch more Session and Command tasks than the Integration Service can run, it places the tasks it cannot run in a queue. When nodes become available, the Load Balancer dispatches tasks from the queue in the order determined by the workflow service level.
DTM PROCESS
When the workflow reaches a session, the Integration Service process starts the DTM process. The DTM is the process associated with the session task. The DTM process performs the following tasks:
  • Retrieves and validates session information from the repository.
  • Performs pushdown optimization when the session is configured for pushdown optimization.
  • Adds partitions to the session when the session is configured for dynamic partitioning.
  • Expands the service process variables, session parameters, and mapping variables and parameters.
  • Creates the session log.
  • Validates source and target code pages.
  • Verifies connection object permissions.
  • Runs pre-session shell commands, stored procedures, and SQL.
  • Sends a request to start worker DTM processes on other nodes when the session is configured to run on a grid.
  • Creates and run mapping, reader, writer, and transformation threads to extract, transform, and load data.
  • Runs post-session stored procedures, SQL, and shell commands.
  • Sends post-session email.
PROCESSING THREADS
The DTM allocates process memory for the session and divides it into buffers. This is also known as buffer memory. The default memory allocation is 12,000,000 bytes.
The DTM uses multiple threads to process data in a session. The main DTM thread is called the master thread.
The master thread can create the following types of threads:
  •  Mapping Threads: One mapping thread for each session.
  •  Pre- and Post-Session Threads: One thread created.
  •  Reader Threads: One thread for each partition
  •  Transformation Threads: One thread for each partition
  •  Writer Threads: One thread for each partition
CODE PAGES and DATA MOVEMENT
A code page contains the encoding to specify characters in a set of one or more languages. An encoding is the assignment of a number to a character in the character set.
The Integration Service can move data in either ASCII or Unicode data movement mode. These modes determine how the Integration Service handles character data.
We choose the data movement mode in the Integration Service configuration settings. If we want to move multi byte data, choose Unicode data movement mode.
ASCII Data Movement Mode: In ASCII mode, the Integration Service recognizes 7-bit ASCII and EBCDIC characters and stores each character in a single byte.
Unicode Data Movement Mode: Use Unicode data movement mode when sources or targets use 8-bit or multi byte character sets and contain character data.

For more Visit  http://www.quontrasolutions.com/blog/category/informatica/

Try your Hand’s on Admin-Console in Informatica - Quontra Solutions

Repository Manager Tasks:
  • Add domain connection information
  • Add and connect to a repository
  • Work with Power Center domain and repository connections
  • Search for repository objects or keywords
  • View object dependencies
  • Compare repository objects
  • Truncate session and workflow log entries
  • View user connections
  • Release locks
  • Exchange metadata with other business intelligence tools
Add a repository to the Navigator, and then configure the domain connection information when we connect to the repository.
1.Adding a Repository to the Navigator :
1. In any of the Power Center Client tools, click Repository > Add.
clip_image002
2. Enter the name of the repository and a valid repository user name.
3. Click OK.
Before we can connect to the repository for the first time, we must configure the Connection information for the domain that the repository belongs to.
clip_image004clip_image007clip_image008clip_image030clip_image031
2.Configuring a Domain Connection
  1. In a Power Center Client tool, select the Repositories node in the Navigator.
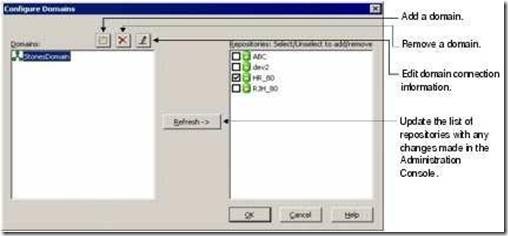
  2. Click Repository > Configure Domains to open the Configure Domains dialog box.
  3. Click the Add button. The Add Domain dialog box appears.
  4. Enter the domain name, gateway host name, and gateway port number.
  5. Click OK to add the domain connection.
3.Connecting to a Repository
  1. Launch a Power Center Client tool.
  2. Select the repository in the Navigator and click Repository > Connect, or double-click the repository.
  3. Enter a valid repository user name and password.
  4. Click Connect.
Click on more button to add, change or view domain information.
clip_image033clip_image014[1]
4.Viewing Object Dependencies
Before we change or delete repository objects, we can view dependencies to see the impact on other objects. For example, before you remove a session, we can find out which workflows use the session. We can view dependencies for repository objects in the Repository Manager, Workflow Manager, and Designer tools.
Steps:
  1. Connect to the repository.
  2. Select the object of use in navigator.
  3. Click Analyze and Select the dependency we want to view.
5.Validating Multiple Objects
We can validate multiple objects in the repository without fetching them into the workspace. We can save and optionally check in objects that change from invalid to valid status as a result of the validation. We can validate sessions, mappings, mapplets, workflows, and worklets.
Steps:
  1. Select the objects you want to validate.
  2. Click Analyze and Select Validate
  3. Select validation options from the Validate Objects dialog box
  4. Click Validate.
  5. Click a link to view the objects in the results group.
6.Comparing Repository Objects
We can compare two repository objects of the same type to identify differences between the objects. For example, we can compare two sessions to check for differences. When we compare two objects, the Repository Manager displays their attributes.
Steps:
  1. In the Repository Manager, connect to the repository.
  2. In the Navigator, select the object you want to compare.
  3. Click Edit > Compare Objects.
  4. Click Compare in the dialog box displayed.
7.Truncating Workflow and Session Log Entries
When we configure a session or workflow to archive session logs or workflow logs, the Integration Service saves those logs in local directories. The repository also creates an entry for each saved workflow log and session log. If we move or delete a session log or workflow log from the workflow log directory or session log directory, we can remove the entries from the repository.
Steps:
  1. In the Repository Manager, select the workflow in the Navigator window or in the Main window.
  2. Choose Edit > Truncate Log. The Truncate Workflow Log dialog box appears.
  3. Choose to delete all workflow and session log entries or to delete all workflow and session log entries with an end time before a particular date.
  4. If you want to delete all entries older than a certain date, enter the date and time.
  5. Click OK.
8.Managing User Connections and Locks
In the Repository Manager, we can view and manage the following items:
Repository object locks: The repository locks repository objects and folders by user. The repository creates different types of locks depending on the task. The Repository Service locks and unlocks all objects in the repository.
User connections: Use the Repository Manager to monitor user connections to the repository. We can end connections when necessary.
Types of locks created:
1. In-use lock: Placed on objects we want to view
2. Write-intent lock: Placed on objects we want to modify.
3. Execute lock: Locks objects we want to run, such as workflows and sessions
Steps:
  1. Launch the Repository Manager and connect to the repository.
  2. Click Edit > Show User Connections or Show locks
  3. The locks or user connections will be displayed in a window.
  4. We can do the rest as per our need.
9.Managing Users and Groups
  1. In the Repository Manager, connect to a repository.
  2. Click Security > Manage Users and Privileges.
  3. Click the Groups tab to create Groups. or
  4. Click the Users tab to create Users
  5. Click the Privileges tab to give permissions to groups and users.
  6. Select the options available to add, edit, and remove users and groups.
There are two default repository user groups:
Administrators: This group initially contains two users that are created by default.
The default users are Administrator and the database user that created the repository. We cannot delete these users from the repository or remove them from the Administrators group.
Public: The Repository Manager does not create any default users in the Public group.
10 Working with Folders
We can create, Edit or delete folder as per our need.
  1. In the Repository Manager, connect to a repository.
  2. Click Folder > Create.
Enter the following information:
clip_image035
3. Click ok.

For more Visit  http://www.quontrasolutions.com/blog/category/informatica/

Informatica Interview Questions on Sorter Transformation – Quontra Solutions

1. What is a sorter transformation?
Sorter transformation is used to sort the data. You can sort the data either in ascending or descending order according to a specified sort key.
2. Why sorter is an active transformation?
As sorter transformation can suppress the duplicate records in the source, it is called an active transformation.
3. How to improve the performance of a session using sorter transformation?
Sort the data using sorter transformation before passing in to aggregator or joiner transformation. As the data is sorted, the integration service uses the memory to do aggregate and join operations and does not use cache files to process the data.


Generate rows based on a column value in Informatica - QUontra Solutions

Q) How to generate or load values in to the target table based on a column value using informatica etl tool.
I have the products table as the source and the data of the products table is shown below.
Table Name: Products
Product  Quantity
-----------------
Samsung  NULL
Iphone   3
LG       0
Nokia    4
Now i want to duplicate or repeat each product in the source table as many times as the value in the quantity column. The output is
product  Quantity
----------------
Iphone   3
Iphone   3
Iphone   3
Nokia    4
Nokia    4
Nokia    4
Nokia    4
The Samsung and LG products should not be loaded as their quantity is NULL, 0 respectively.
Now create informatica workflow to load the data in to the target table?
Solution:
Follow the below steps
  • Create a new mapping in the mapping designer
  • Drag the source definition in to the mapping
  • Create the java transformation in active mode
  • Drag the ports of source qualifier transformation in to the java transformation.
  • Now edit the java transformation by double clicking on the title bar of the java transformation and go to the “Java Code” tab.
  • Enter the below java code in the “Java Code” tab.
if (!isNull("quantity"))
{
  double cnt = quantity;
  for (int i = 1; i <= quantity; i++)
  {
    product = product;
    quantity = quantity;
    generateRow();
  }
}
informatica joiner transformation example
  • Now compile the java code. The compile button is shown in red circle in the image.
  • Connect the ports of the java transformation to the target.
  • Save the mapping, create a workflow and run the workflow.

Reverse the Contents of Flat File in Informatica - Quontra Solutions

Q1) I have a flat file, want to reverse the contents of the flat file which means the first record should come as last record and last record should come as first record and load into the target file. As an example consider the source flat file data as
Informatica Enterprise Solution
Informatica Power center
Informatica Power exchange
Informatica Data quality
The target flat file data should look as
Informatica Data quality
Informatica Power exchange
Informatica Power center
Informatica Enterprise Solution
Solution:
Follow the below steps for creating the mapping logic
  • Create a new mapping.
  • Drag the flat file source into the mapping.
  • Create an expression transformation and drag the ports of source qualifier transformation into the expression transformation.
  • Create the below additional ports in the expression transformation and assign the corresponding expressions
Variable port: v_count = v_count+1
Output port o_count = v_count
  • Now create a sorter transformation and drag the ports of expression transformation into it.
  • In the sorter transformation specify the sort key as o_count and sort order as DESCENDING.
  • Drag the target definition into the mapping and connect the ports of sorter transformation to the target.
Q2) Load the header record of the flat file into first target, footer record into second target and the remaining records into the third target.
The solution to this problem I have already posted by using aggregator and joiner. Now we will see how to implement this by reversing the contents of the file.
Solution:
  • Connect the source qualifier transformation to the expression transformation. In the expression transformation create the additional ports as mentioned above.
  • Connect the expression transformation to a router. In the router transformation create an output group and specify the group condition as o_count=1. Connect this output group to a target and the default group to sorter transformation.
  • Sort the data in descending order on o_count port.
  • Connect the output of sorter transformation to expression transformation (don’t connect o_count port).
  • Again in the expression transformation create the same additional ports mentioned above.
  • Connect this expression transformation to router and create an output group. In the output group specify the condition as o_count=1 and connect this group to second target. Connect the default group to the third group.


Dynamic Target Flat File Name Generation in Informatica - Quontra Solutions

Informatica 8.x or later versions provides a feature for generating the target files dynamically. This feature allows you to
  • Create a new file for every session run
  • create a new file for each transaction.
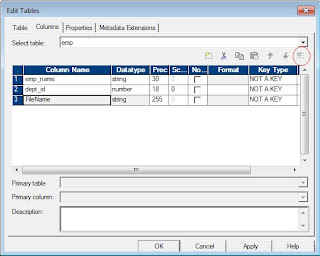
Informatica provides a special port,”FileName” in the Target file definition. This port you have to add explicitly. See the below diagram for adding the “FileName” port.
Go to the Target Designer or Warehouse builder and edit the file definition. You have to click on the button indicated in red color circle to add the special port.
Now we will see some informatica mapping examples for creating the target file name dynamically and load the data.
1. Generate a new file for every session run.
Whenever the session runs you need to create a new file dynamically and load the source data into that file. To do this just follow the below steps:
STEP1: Connect the source qualifier to an expression transformation. In the expression transformation create an output port (call it as File_Name) and assign the expression as ‘EMP_’||to_char(sessstarttime, ‘YYYYMMDDHH24MISS’)||’.dat’
STPE2: Now connect the expression transformation to the target and connect eh File_Name port of expression transformation to the FileName port of the target file definition.
STEP3: Create a workflow and run the workflow.
Here I have used sessstarttime, as it is constant throughout the session run. If you have used sysdate, a new file will be created whenever a new transaction occurs in the session run.
The target file names created would look like EMP_20120101125040.dat.
2. Create a new file for every session run. The file name should contain suffix as numbers (EMP_n.dat)
In the above mapping scenario, the target flat file name contains the suffix as ‘timestamp.dat’. Here we have to create the suffix as a number. So, the file names should looks as EMP_1.dat, EMP_2.dat and so on. Follow the below steps:
STPE1: Go the mappings parameters and variables -> Create a new variable, $$COUNT_VAR and its data type should be Integer
STPE2: Connect the source Qualifier to the expression transformation. In the expression transformation create the following new ports and assign the expressions.
v_count (variable port) = v_count+1
v_file_count (variable port) = IIF(v_count = 1, SETVARIABLE($$COUNT_VAR,$$COUNT_VAR+1),$$COUNT_VAR)
o_file_name (output port) = 'EMP_'||v_file_count||'.dat'
STEP3: Now connect the expression transformation to the target and connect the o_file_name port of expression transformation to the FileName port of the target.
3. Create a new file once a day.
You can create a new file only once in a day and can run the session multiple times in the day to load the data. You can either overwrite the file or append the new data.
This is similar to the first problem. Just change the expression in expression transformation to ‘EMP_’||to_char(sessstarttime, ‘YYYYMMDD’)||’.dat’. To avoid overwriting the file, use Append If Exists option in the session properties.
4. Create a flat file based on the values in a port.
You can create a new file for each distinct values in a port. As an example consider the employees table as the source. I want to create a file for each department id and load the appropriate data into the files.
STEP1: Sort the data on department_id. You can either use the source qualifier or sorter transformation to sort the data.
STEP2: Connect to the expression transformation. In the expression transformation create the below ports and assign expressions.
v_curr_dept_id (variable port) = dept_id
v_flag (variable port) = IIF(v_curr_dept_id=v_prev_dept_id,0,1)
v_prev_dept_id (variable port) = dept_id
o_flag (output port) = v_flag
o_file_name (output port) = dept_id||'.dat'
STEP4: Now connect the expression transformation to the transaction control transformation and specify the transaction control condition as
IIF(o_flag = 1, TC_COMMIT_BEFORE, TC_CONTINUE_TRANSACTION)
STEP5: Now connect to the target file definition.

Informatica Problems With Solutions – Part 1 -- QuontraSolutions

1. In this problem we will see how to implement the not equal operator, greater than, greater than or equal to, less than and less than or equal to operators when joining two tables in informatica.
Consider the below sales table as an example?
Table name: Sales
product, prod_quantity, price , Year
A         , 10                 , 100  , 2010
B         , 15                 , 150  , 2010
A         , 8                   , 80    , 2011
B         , 26                 , 260  , 2011
Now the problem is to identify the products whose sales is less than in the current year (In this example: 2011) when compared to the last year.
Here in this example, Product A sold less in 2011 when compared with the sales in 2010.
This problem can be easily implemented with the help of SQL query as shown below
SELECT  cy.*
FROM    SALES cy,
SALES py
WHERE   cy.product = py.product
AND        cy.year=2011
AND        py.year=2010
AND       cy.prod_quantity < py.prod_quantity;
In informatica, you can specify only equal to condition in joiner. Now we will see how to implement this problem using informatica.
Solution:
STEP1: Connect two source qualifier transformations to the source definition. Call the first source qualifier transformation as sq_cy  (cy means current year) and the other as sq_py  (py means previous year).
STEP2: In the sq_cy source qualifier transformation, specify the source filter as price=2011. In the sq_py, specify the source filter as price=2010
STEP3: Now connect these two source qualifier transformations to joiner transformation and make sq_cy as master, sq_py as detail. In the join condition, select the product port from master and detail.
STEP4: Now connect all the master ports and only the prod_quantity port from detail to the filter transformation. In the filter transformation specify the filter condition as prod_quantity < prod_quantity1. Here pord_quantity port is from master port and prod_quantity1 is from detail port.
STEP4: Connect all the ports except the prod_quantity1 of filter transformation to the target definition.
2. How to implement the not exists operator in informatica which is available in database?
Solution:
Implementing the Not Exists operator is very easy in informatica. For example, we want to get only the records which are available in table A and not in table B. For this use a joiner transformation with A as master and B as detail. Specify the join condition and in the join type, select detail outer join. This will get all the records from A table and only the matching records from B table.
Connect the joiner to a filter transformation and specify the filter condition as B_port is NULL. This will give the records which are in A and not in B. Then connect the filter to the target definition.

Informatica Scenario Based Questions – Part 2 -- Quontra Solutions

1. Consider the following employees data as source
employee_id, salary
10, 1000
20, 2000
30, 3000
40, 5000
Q1. Design a mapping to load the cumulative sum of salaries of employees into target table?
The target table data should look like as
employee_id, salary, cumulative_sum
10, 1000, 1000
20, 2000, 3000
30, 3000, 6000
40, 5000, 11000
Solution:
Connect the source Qualifier to expression transformation. In the expression transformation, create a variable port V_cum_sal and in the expression editor write V_cum_sal+salary. Create an output port O_cum_sal and assign V_cum_sal to it.
Q2. Design a mapping to get the pervious row salary for the current row. If there is no pervious row exists for the current row, then the pervious row salary should be displayed as null.
The output should look like as
employee_id, salary, pre_row_salary
10, 1000, Null
20, 2000, 1000
30, 3000, 2000
40, 5000, 3000
Solution:
Connect the source Qualifier to expression transformation. In the expression transformation, create a variable port V_count and increment it by one for each row entering the expression transformation. Also create V_salary variable port and assign the expression IIF(V_count=1,NULL,V_prev_salary) to it . Then create one more variable port V_prev_salary and assign Salary to it. Now create output port O_prev_salary and assign V_salary to it. Connect the expression transformation to the target ports.
In the expression transformation, the ports will be
employee_id
salary
V_count=V_count+1
V_salary=IIF(V_count=1,NULL,V_prev_salary)
V_prev_salary=salary
O_prev_salary=V_salary
Q3. Design a mapping to get the next row salary for the current row. If there is no next row for the current row, then the next row salary should be displayed as null.
The output should look like as
employee_id, salary, next_row_salary
10, 1000, 2000
20, 2000, 3000
30, 3000, 5000
40, 5000, Null
Solution:
Step1: Connect the source qualifier to two expression transformation. In each expression transformation, create a variable port V_count and in the expression editor write V_count+1. Now create an output port O_count in each expression transformation. In the first expression transformation, assign V_count to O_count. In the second expression transformation assign V_count-1 to O_count.
In the first expression transformation, the ports will be
employee_id
salary
V_count=V_count+1
O_count=V_count
In the second expression transformation, the ports will be
employee_id
salary
V_count=V_count+1
O_count=V_count-1
Step2: Connect both the expression transformations to joiner transformation and join them on the port O_count. Consider the first expression transformation as Master and second one as detail. In the joiner specify the join type as Detail Outer Join. In the joiner transformation check the property sorted input, then only you can connect both expression transformations to joiner transformation.
Step3: Pass the output of joiner transformation to a target table. From the joiner, connect the employee_id, salary which are obtained from the first expression transformation to the employee_id, salary ports in target table. Then from the joiner, connect the salary which is obtained from the second expression transformaiton to the next_row_salary port in the target table.
Q4. Design a mapping to find the sum of salaries of all employees and this sum should repeat for all the rows.
The output should look like as
employee_id, salary, salary_sum
10, 1000, 11000
20, 2000, 11000
30, 3000, 11000
40, 5000, 11000
Solution:
Step1: Connect the source qualifier to the expression transformation. In the expression transformation, create a dummy port and assign value 1 to it.
In the expression transformation, the ports will be
employee_id
salary
O_dummy=1
Step2: Pass the output of expression transformation to aggregator. Create a new port O_sum_salary and in the expression editor write SUM(salary). Do not specify group by on any port.
In the aggregator transformation, the ports will be
salary
O_dummy
O_sum_salary=SUM(salary)
Step3: Pass the output of expression transformation, aggregator transformation to joiner transformation and join on the DUMMY port. In the joiner transformation check the property sorted input, then only you can connect both expression and aggregator to joiner transformation.
Step4: Pass the output of joiner to the target table.
2. Consider the following employees table as source
department_no, employee_name
20, R
10, A
10, D
20, P
10, B
10, C
20, Q
20, S
Q1. Design a mapping to load a target table with the following values from the above source?
department_no, employee_list
10, A
10, A,B
10, A,B,C
10, A,B,C,D
20, A,B,C,D,P
20, A,B,C,D,P,Q
20, A,B,C,D,P,Q,R
20, A,B,C,D,P,Q,R,S
Solution:
Step1: Use a sorter transformation and sort the data using the sort key as department_no and then pass the output to the expression transformation. In the expression transformation, the ports will be
department_no
employee_name
V_employee_list = IIF(ISNULL(V_employee_list),employee_name,V_employee_list||’,’||employee_name)
O_employee_list = V_employee_list
Step2: Now connect the expression transformation to a target table.
Q2. Design a mapping to load a target table with the following values from the above source?
department_no, employee_list
10, A
10, A,B
10, A,B,C
10, A,B,C,D
20, P
20, P,Q
20, P,Q,R
20, P,Q,R,S
Solution:
Step1: Use a sorter transformation and sort the data using the sort key as department_no and then pass the output to the expression transformation. In the expression transformation, the ports will be
department_no
employee_name
V_curr_deptno=department_no
V_employee_list = IIF(V_curr_deptno! = V_prev_deptno,employee_name,V_employee_list||’,’||employee_name)
V_prev_deptno=department_no
O_employee_list = V_employee_list
Step2: Now connect the expression transformation to a target table.
Q3. Design a mapping to load a target table with the following values from the above source?
department_no, employee_names
10, A,B,C,D
20, P,Q,R,S
Solution:
The first step is same as the above problem. Pass the output of expression to an aggregator transformation and specify the group by as department_no. Now connect the aggregator transformation to a target table.

For more Visit  http://www.quontrasolutions.com/blog/category/informatica/