Try your Hand’s on Admin-Console
Repository Manager Tasks:
1.Adding a Repository to the Navigator :
1. In any of the Power Center Client tools, click Repository > Add.

2. Enter the name of the repository and a valid repository user name.
3. Click OK.
Before we can connect to the repository for the first time, we must configure the Connection information for the domain that the repository belongs to.


2.Configuring a Domain Connection
3.Connecting to a Repository

![clip_image014[1]](https://blogger.googleusercontent.com/img/b/R29vZ2xl/AVvXsEij23pGk52DkWgtHhpP33e-rGtHm9SbbGLGjyBRLPb7yByrVEGmadhiT9Mvv06pS_cTuU7jWkM3cwnduLM0RRpai-HzKJaaaYkMYdN1uyPy9lk9PIApBq6GUdTL2WLR_gWMahqLBlmeY7lh/?imgmax=800 "clip_image014[1]")
4.Viewing Object Dependencies
Before we change or delete repository objects, we can view dependencies to see the impact on other objects. For example, before you remove a session, we can find out which workflows use the session. We can view dependencies for repository objects in the Repository Manager, Workflow Manager, and Designer tools.
Steps:
We can validate multiple objects in the repository without fetching them into the workspace. We can save and optionally check in objects that change from invalid to valid status as a result of the validation. We can validate sessions, mappings, mapplets, workflows, and worklets.
Steps:
We can compare two repository objects of the same type to identify differences between the objects. For example, we can compare two sessions to check for differences. When we compare two objects, the Repository Manager displays their attributes.
Steps:
When we configure a session or workflow to archive session logs or workflow logs, the Integration Service saves those logs in local directories. The repository also creates an entry for each saved workflow log and session log. If we move or delete a session log or workflow log from the workflow log directory or session log directory, we can remove the entries from the repository.
Steps:
In the Repository Manager, we can view and manage the following items:
Repository object locks: The repository locks repository objects and folders by user. The repository creates different types of locks depending on the task. The Repository Service locks and unlocks all objects in the repository.
User connections: Use the Repository Manager to monitor user connections to the repository. We can end connections when necessary.
Types of locks created:
1. In-use lock: Placed on objects we want to view
2. Write-intent lock: Placed on objects we want to modify.
3. Execute lock: Locks objects we want to run, such as workflows and sessions
Steps:
Administrators: This group initially contains two users that are created by default.
The default users are Administrator and the database user that created the repository. We cannot delete these users from the repository or remove them from the Administrators group.
Public: The Repository Manager does not create any default users in the Public group.
10 Working with Folders
We can create, Edit or delete folder as per our need.

3. Click ok.
Informatica online training - Informatica Jobs
Repository Manager Tasks:
- Add domain connection information
- Add and connect to a repository
- Work with Power Center domain and repository connections
- Search for repository objects or keywords
- View object dependencies
- Compare repository objects
- Truncate session and workflow log entries
- View user connections
- Release locks
- Exchange metadata with other business intelligence tools
1.Adding a Repository to the Navigator :
1. In any of the Power Center Client tools, click Repository > Add.

2. Enter the name of the repository and a valid repository user name.
3. Click OK.
Before we can connect to the repository for the first time, we must configure the Connection information for the domain that the repository belongs to.


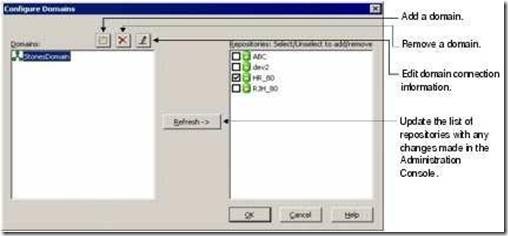
2.Configuring a Domain Connection
- In a Power Center Client tool, select the Repositories node in the Navigator.
- Click Repository > Configure Domains to open the Configure Domains dialog box.
- Click the Add button. The Add Domain dialog box appears.
- Enter the domain name, gateway host name, and gateway port number.
- Click OK to add the domain connection.
3.Connecting to a Repository
- Launch a Power Center Client tool.
- Select the repository in the Navigator and click Repository > Connect, or double-click the repository.
- Enter a valid repository user name and password.
- Click Connect.
![clip_image014[1]](https://blogger.googleusercontent.com/img/b/R29vZ2xl/AVvXsEhD5d-P7WRDHhyEJrV998wuagAu5KGIdbUkSilKrZLvULABlkHmDAUmRu0N_pzZzrPCwQqBSzF4sO-3ebe8l98LKeq9gSP2KMN2Fj18oZ5QF493seqX2Zonza6ekkrUi5iQqqURuNJVZQ2s/s1600-h/clip_image014%5B1%5D%5B2%5D.gif "clip_image014[1]")
4.Viewing Object Dependencies
Before we change or delete repository objects, we can view dependencies to see the impact on other objects. For example, before you remove a session, we can find out which workflows use the session. We can view dependencies for repository objects in the Repository Manager, Workflow Manager, and Designer tools.
Steps:
- Connect to the repository.
- Select the object of use in navigator.
- Click Analyze and Select the dependency we want to view.
We can validate multiple objects in the repository without fetching them into the workspace. We can save and optionally check in objects that change from invalid to valid status as a result of the validation. We can validate sessions, mappings, mapplets, workflows, and worklets.
Steps:
- Select the objects you want to validate.
- Click Analyze and Select Validate
- Select validation options from the Validate Objects dialog box
- Click Validate.
- Click a link to view the objects in the results group.
We can compare two repository objects of the same type to identify differences between the objects. For example, we can compare two sessions to check for differences. When we compare two objects, the Repository Manager displays their attributes.
Steps:
- In the Repository Manager, connect to the repository.
- In the Navigator, select the object you want to compare.
- Click Edit > Compare Objects.
- Click Compare in the dialog box displayed.
When we configure a session or workflow to archive session logs or workflow logs, the Integration Service saves those logs in local directories. The repository also creates an entry for each saved workflow log and session log. If we move or delete a session log or workflow log from the workflow log directory or session log directory, we can remove the entries from the repository.
Steps:
- In the Repository Manager, select the workflow in the Navigator window or in the Main window.
- Choose Edit > Truncate Log. The Truncate Workflow Log dialog box appears.
- Choose to delete all workflow and session log entries or to delete all workflow and session log entries with an end time before a particular date.
- If you want to delete all entries older than a certain date, enter the date and time.
- Click OK.
In the Repository Manager, we can view and manage the following items:
Repository object locks: The repository locks repository objects and folders by user. The repository creates different types of locks depending on the task. The Repository Service locks and unlocks all objects in the repository.
User connections: Use the Repository Manager to monitor user connections to the repository. We can end connections when necessary.
Types of locks created:
1. In-use lock: Placed on objects we want to view
2. Write-intent lock: Placed on objects we want to modify.
3. Execute lock: Locks objects we want to run, such as workflows and sessions
Steps:
- Launch the Repository Manager and connect to the repository.
- Click Edit > Show User Connections or Show locks
- The locks or user connections will be displayed in a window.
- We can do the rest as per our need.
- In the Repository Manager, connect to a repository.
- Click Security > Manage Users and Privileges.
- Click the Groups tab to create Groups. or
- Click the Users tab to create Users
- Click the Privileges tab to give permissions to groups and users.
- Select the options available to add, edit, and remove users and groups.
Administrators: This group initially contains two users that are created by default.
The default users are Administrator and the database user that created the repository. We cannot delete these users from the repository or remove them from the Administrators group.
Public: The Repository Manager does not create any default users in the Public group.
10 Working with Folders
We can create, Edit or delete folder as per our need.
- In the Repository Manager, connect to a repository.
- Click Folder > Create.

3. Click ok.
Informatica online training - Informatica Jobs

